
There is nowhere on earth quite like the Everglades. As a photographer, walking into "The Glades" feels like stepping back into a prehistoric world. You have the haunting calls of the Limpkin, the prehistoric silhouette of an American Alligator breaking the surface of a dark slough, and the vibrant pink splash of a Roseate Spoonbill flying against a deep blue sky.
However, capturing the raw beauty of this UNESCO World Heritage site isn't as simple as showing up and pressing a button. The humidity can be punishing, the light can be tricky, and the wildlife: while abundant: requires a certain level of respect and technical know-how to capture effectively.
At Photoguides, we want to make sure your next trip to the swamp is a successful one. Whether you are a hobbyist or looking to go pro, these 15 essential tips will help you master wildlife photography in the Everglades. If you want a deep dive into the specific locations and hidden gems of the park, don’t forget to check out our comprehensive Everglades Photography Guide.
1. Timing is Everything: The Dry Season Advantage
If you want to see the highest concentration of wildlife, you need to visit during the dry season, which typically runs from November to April. As the water levels across the sawgrass prairies drop, the fish and crustaceans are forced into deeper "gator holes" and canals. Naturally, the predators follow.
During these months, you’ll find birds like herons, egrets, and storks practically standing on top of each other. This is also the peak nesting season, offering a rare look at chicks and mating rituals.
2. Embrace the Golden Hour
In the Glades, the sun is your best friend and your worst enemy. Mid-day sun in Florida is harsh, flat, and creates deep, unflattering shadows. To get those professional-grade shots, you need to be at your first location before the sun even peaks over the horizon.
The soft, warm light of the golden hour brings out the intricate textures of bird feathers and the armored scales of alligators. Plus, the activity levels of the animals are highest during dawn and dusk. For more tips on mastering light, visit our educational category.

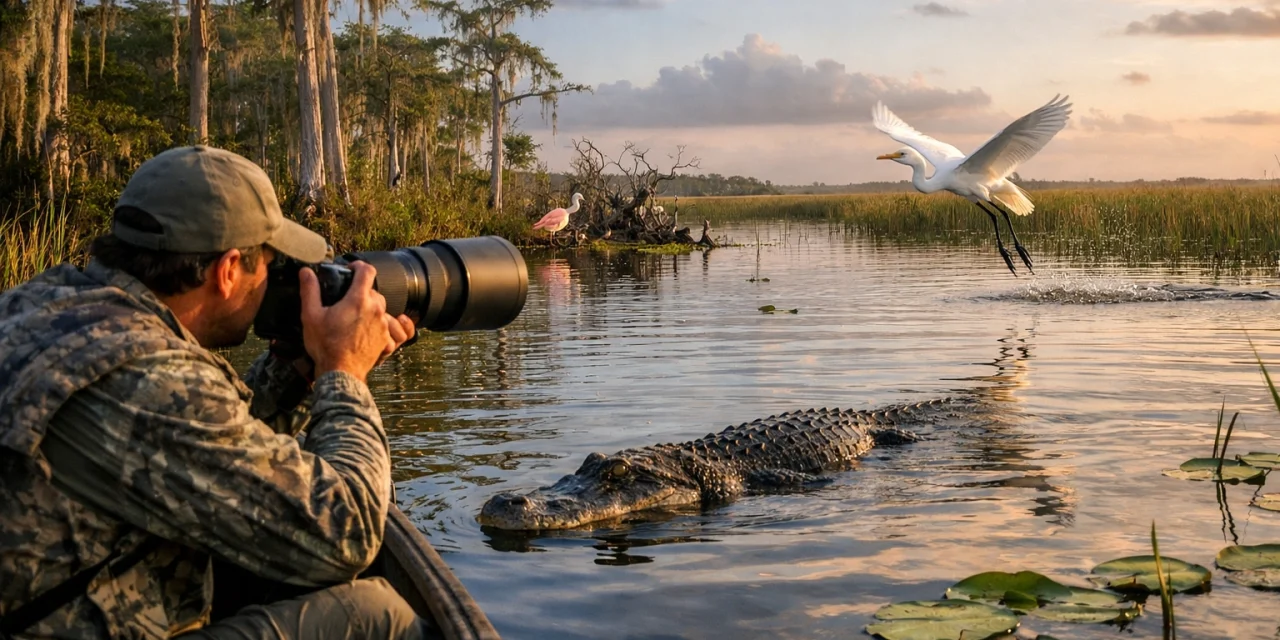
3. Go Long: Choosing the Right Telephoto Lens
Distance is a safety requirement and an aesthetic choice. For bird photography, a lens with a focal length of at least 300mm is essential, though 500mm or 600mm is the gold standard. A long lens allows you to fill the frame with your subject without infringing on their space.
If you are using a mirrorless or DSLR system, a 150-600mm zoom lens is an incredibly versatile tool for the Everglades, allowing you to quickly switch from a full-body alligator shot to a tight portrait of a Great Blue Heron.
4. Don’t Forget the Wide Angle
While wildlife is the star of the show, the Everglades landscape is breathtaking. A wide-angle lens (16-35mm) is perfect for capturing the "River of Grass" or those iconic cypress domes under a dramatic sunset. Including the environment in your wildlife shots: known as "animal in landscape" photography: tells a much more compelling story than a simple tight portrait.
5. Master Your Shutter Speed
Wildlife moves fast. Whether it's a Snail Kite diving for a snack or an Osprey taking flight, you need a shutter speed of at least 1/1200s or higher to freeze that motion. If you’re photographing stationary subjects, you can drop it down, but in the Glades, you should always be prepared for sudden movement.

6. Use Continuous Autofocus (AF-C or AI Servo)
Never use single-shot focus for wildlife. Animals are constantly shifting, even if they appear still. By using continuous autofocus, your camera will track the subject’s movement, ensuring that the eye: which is the most important part of any wildlife photo: remains tack sharp. If your camera has Bird Eye-AF, make sure it is turned on; it’s a game-changer for the fast-moving environment of the Florida swamps.
7. The Power of a Polarizing Filter
Water is everywhere in the Everglades. Reflections can be beautiful, but glare can ruin a shot by washing out colors and hiding what’s beneath the surface. A circular polarizing filter is a must-have. It cuts through the glare on the water and the sheen on wet leaves, resulting in deeper greens and more saturated blues. You can find more about essential gear on our essential photography gear page.
8. Stability Matters: Tripods and Gimbals
Holding a heavy 600mm lens for four hours is a recipe for shaky photos and a sore back. A sturdy tripod is vital for low-light morning shots. For wildlife specifically, a gimbal head is the best investment you can make. It balances your heavy lens, allowing you to track a flying bird with just the tip of your finger.
9. Get Low for Intimacy
One of the biggest mistakes beginners make is shooting from eye level. When you photograph an alligator or a shorebird from a standing position, you are looking down on them, which creates a "documentary" feel.
If you get low: sometimes even lying on the boardwalk or the ground: you enter the animal's world. Eye-level shots create an intimate connection between the viewer and the subject, making the animal feel much more powerful.

10. Protect Your Gear from the Elements
The Everglades is a high-humidity environment, and sudden rain showers are common. Always carry a dedicated rain cover for your camera and lens. Additionally, if you are moving from a cold, air-conditioned car into the humid swamp, your lens will fog up instantly. Give your gear 15–20 minutes to acclimate to the outside temperature before you start shooting. For more gear maintenance tips, see our camera reviews 2024.
11. Learn to Read Animal Behavior
The best wildlife photographers aren't just good with cameras; they are amateur naturalists. If you see a heron crouching and tensing its neck, it’s about to strike. If you see a bird fluttering its wings while perched, it’s likely about to take flight. By learning these "tells," you can anticipate the action and have your finger on the shutter before it happens.
Our Everglades Photography Guide covers specific behaviors to look for in the park's most iconic species.
12. Use Exposure Bracketing for High Contrast
The Florida sky can be incredibly bright while the shadows under the mangroves remain dark. To capture the full dynamic range of a scene, use exposure bracketing. This takes three or more shots at different exposure levels, which you can later blend in post-processing to ensure you don't lose detail in the highlights or the shadows.
13. Patience is Your Greatest Tool
Wildlife photography is 90% waiting and 10% shooting. If you find a beautiful spot where birds are congregating, don't just snap a few photos and leave. Sit down, be quiet, and wait. Often, the animals will forget you are there and return to their natural behaviors, giving you the kind of authentic shots that "drive-by" photographers miss.

14. Use Your Car as a Blind
In places like Shark Valley or the Loop Road, wildlife is often habituated to vehicles. Surprisingly, birds and alligators are often less spooked by a slow-moving car than they are by a person walking. Using your car as a mobile blind allows you to get incredibly close to subjects without disturbing them. Just remember to turn off the engine to avoid camera shake from the vibrations!
15. Respect the Wildlife and the Environment
This is the most important tip of all. No photo is worth distressing an animal or damaging the ecosystem. Keep a respectful distance (especially from nesting birds and alligators), never feed the wildlife, and stay on designated paths where required. Ethical photography not only protects the park but also ensures that the animals behave naturally, leading to better photos.
Taking Your Skills to the Next Level
Mastering the Glades takes time and practice. If you are planning a trip to South Florida and want to skip the learning curve, I highly recommend picking up a copy of the Everglades Photography Guide. It includes the exact GPS coordinates of the best spots, the best times to visit each location, and specific gear recommendations tailored for the swamp.
Beyond the Everglades, if you are looking for more inspiration or want to see how these techniques look in a professional gallery setting, feel free to browse my work at Edin Fine Art or check out more tutorials on the Edin Chavez Blog.
The Everglades is a place of endless mystery and beauty. With these tips in your pocket and a bit of patience, you'll come home with a portfolio that truly captures the spirit of the Florida wild. Happy shooting!


