Essential Equipment for Landscape Photography
A good camera is where your landscape photography journey begins. DSLRs and mirrorless cameras are the go-to choices for capturing nature's beauty. While smartphones can capture decent shots, they lack the customization options and image quality that dedicated cameras offer.
Pairing your camera with the right lens is just as crucial. Wide-angle lenses, those with focal lengths of 35mm and below, capture more of the scene, making them indispensable for those sweeping vistas. Keep your lenses clean to preserve their lifespan and image quality.
A sturdy tripod is essential for eliminating camera shake, especially during long exposures. Look for tripods with spiked feet and rubber overshoes; they keep your camera steady on various terrains.
Filters are your secret weapons in landscape photography.
- Polarizing filters manage reflections and make skies pop with deep, contrasting blues.
- Neutral density filters let you play with exposure without overexposing your images, achieving dreamy waterfall shots or the smooth look of flowing water.
Shutter releases let you click the shutter without touching the camera, avoiding any last-minute shakes during long exposures.
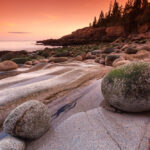
Keep an eye out for landscapes with interesting foreground elements like rocks, plants, or puddles. These elements add depth and interest to your images.
Golden hour – right after sunrise and just before sunset – provides the most beautiful light. Carry apps that track the sun's angles and plan your shoots around them.
Shooting in RAW is important for serious photographers. RAW files keep all the image data, making them easier to edit without degrading the image quality.
Don't forget to bring extra gear like lens hoods, spare batteries, and memory cards. A good camera bag with padded compartments and weather-resistant materials protects your equipment, allowing you to shoot in diverse conditions.

Mastering Manual Exposure
Understanding the interplay between shutter speed, aperture, and ISO is vital when exploring manual exposure. These three elements form the "exposure triangle" that every landscape photographer must master to capture the essence of a scene accurately.
Shutter Speed
Shutter speed dictates how long your camera's sensor is exposed to light. A fast shutter speed freezes motion, while a slower shutter speed can create a dreamy, blurred effect.
Aperture
Aperture, denoted by f-stops, controls the size of your lens's iris. A wider aperture allows more light in and creates a shallow depth of field, while a narrower aperture brings more of the scene into focus.
ISO
ISO measures your camera's sensitivity to light. Lower ISO settings produce images with minimal noise, while higher ISO settings come into play in lower light conditions but can introduce noise.
Balancing these three settings is where the magic happens. Each scene and lighting condition might require a different combination. Experimenting in Manual Mode allows you to tweak each setting individually, finding that sweet spot where you can capture the scene as you envision it.
The more you practice, the more intuitive it becomes. Reflect on each outing and understand how your settings impact the final image. Mastering manual exposure is about creating images that reflect the emotion and grandeur of the landscapes before you.

Composition Techniques
Composition is the backbone of any successful landscape photograph. Key techniques include the Rule of Thirds, leading lines, and incorporating foreground elements, all of which help guide the viewer's eye and add layers of interest to your images.
Rule of Thirds
The Rule of Thirds involves dividing your frame into nine equal parts and placing crucial elements along these lines or at their intersections. This technique adds balance and creates a more dynamic photograph.1
Leading Lines
Leading lines are natural lines in the landscape that draw the viewer's eye through the image and to the main subject. These lines can be anything from a winding river to a path cutting through a forest.
Foreground Elements
Incorporating foreground elements such as rocks, flowers, or logs anchors the viewer's eye and provides a starting point before moving deeper into the frame. This creates a three-dimensional feel and makes the viewer feel as if they are stepping into the scene.
Choosing a point of focus is crucial in ensuring your composition holds the viewer's attention. Your focal point should be where you want viewers to linger, allowing them to appreciate the finer details and story of the landscape.
Creating depth through techniques like layering helps achieve a visually rich scene that invites viewers to explore every level of the image.
Changing your perspective by getting low to the ground or finding a higher vantage point can vastly improve your composition, revealing leading lines or elements that weren't apparent from your initial viewpoint.
Light plays a vital role in composition. Shadows can create leading lines or emphasize texture, while the angle of light during golden hours can add layers of contrast and color.2
Post-processing can further enhance your compositions through cropping, adjusting lines, or refining the inherent beauty of the landscape.
Mastering these composition techniques requires practice and patience. Continually critique your work, try new perspectives, and consider how you can guide the viewer's eye to tell the story you want to convey. Refining your compositional skills is a continual process that turns everyday scenes into captivating art.

Lighting and Timing
Lighting is crucial in landscape photography. Without the right lighting, even stunning landscapes can fall flat. Understanding the best times to shoot and how to work with varying weather conditions can dramatically improve your photos.
Golden hour—immediately after sunrise and before sunset—is often the most magical time for landscape photography. The sun is low, casting a warm, golden light that enhances colors and textures, making them more vibrant. Shadows are long and soft, providing gentle contrast and depth. The angled light emphasizes the landscape's contours, bringing out more detail.
Blue hour, the twilight period just before sunrise and after sunset, is equally captivating. The sky takes on a deep blue hue, and the landscape is bathed in diffuse, soft light. This time is excellent for capturing moody and atmospheric shots. Reflections are more pronounced in water during blue hour, and the sky's colors can create a beautiful, ethereal backdrop.
Planning is crucial. Use apps like The Photographer's Ephemeris or PhotoPills to track the sun's position and anticipate how it will interact with the landscape. These tools help you understand light angles, allowing you to plan shoots for optimal lighting.
Don't shy away from bad weather. Overcast days provide soft, even lighting that eliminates harsh shadows and highlights. Clouds act as a natural diffuser, spreading light more evenly and adding mood. Fog and mist can be incredibly evocative, creating a sense of mystery and depth.
Stormy weather can provide dramatic shots. Dark clouds, the interplay of light and shadow, and the aftermath—like a double rainbow or clearing mist—offer unique opportunities. Ensure you have weather-sealed equipment or protective gear.
Adaptability is key when working with different lighting. If dealing with harsh midday sunlight, consider shooting in shaded areas or using stark shadows creatively. Use graduated neutral density filters to balance exposure between bright sky and darker landscape.
Stay flexible in rapidly changing weather. Sometimes, the best shots come just as the sun breaks through the clouds after the rain, creating stunning beams of light. Be ready and patient.
Reflect on integrating travel experience and planning with tools like Google Maps and Street View to scout locations. This ensures that when the light is perfect, you're ready to capture the scene.
Balancing light requires attention to time of day, weather, and ambient conditions. Each landscape has its own unique light dynamics that you'll learn to anticipate and capitalize on with practice.
By embracing the dynamic dance of natural light and making the most of every opportunity, you transform not just your photographs, but also your experience of the landscape.

Post-Processing Tips
Post-processing is essential in taking your landscape images from great to phenomenal. Advanced techniques in software like Adobe Lightroom and Photoshop can significantly enhance your photos.
Consider implementing high dynamic range (HDR) photography. HDR combines multiple exposures to create an image with a broader range of colors and luminance. This allows you to capture details in both shadows and highlights that might be lost in a single exposure.1 In Lightroom, use "Merge to HDR" to combine bracketed shots into one detailed image. This is useful for landscapes with dramatic lighting contrasts.
Sharpening ensures your images are clear and detailed. Lightroom's "Detail" panel allows you to adjust sharpening amount, radius, and detail. Use the mask slider while holding Alt to see which parts will be sharpened; aim to exclude areas like the sky where noise can be introduced. Photoshop's "Unsharp Mask" offers precise control. For added control, consider "Frequency Separation" techniques to independently sharpen details without affecting overall smoothness.
Noise reduction is vital, especially when shooting in low light or with high ISO. Lightroom's "Detail" panel includes noise reduction for luminance and color noise. Balance these carefully; overdoing luminance noise reduction can lead to loss of detail. In Photoshop, selective noise reduction can be performed on specific areas.
Color correction ensures hues and tones match the natural beauty you experienced. Lightroom's "HSL/Color" panel allows individual adjustment of hue, saturation, and luminance. "Split Toning" can add complementary colors to highlights and shadows, enhancing mood. Photoshop's "Selective Color" adjustment layer offers precise tonal control.
Gradients and selective adjustments can transform your images. Use Lightroom's "Graduated Filter" to darken the sky, adding depth. The "Radial Filter" allows localized adjustments, like boosting exposure around a focal point.
Image blending combines multiple exposures or elements to create a compelling image. This works well for complex scenes where dynamic range is too great for a single exposure.2 Use layer masks in Photoshop to blend exposures seamlessly.
Consider artistic finishing touches. Techniques like the "Orton Effect" add a dreamy, glowing atmosphere. Apply this selectively using layers and masks to avoid over-softening details. Ensure your horizon is straight—Lightroom's "Transform" tool can quickly correct tilted horizons.
As you explore post-processing, aim to keep edits subtle and true to the scene. Over-processing can detract from the natural beauty. With practice and patience, these techniques will serve as essential tools in producing images that capture and enhance nature's splendor.

Equip yourself well, practice diligently, and let each outing be an opportunity to create breathtaking images that tell the story of nature's splendor.


