
Category: Photo Guides
If you’ve ever stood on the edge of the Florida Everglades at midday, you know it can feel a bit overwhelming. It’s a massive, sweeping landscape of sawgrass and water that seems to go on forever. For a photographer, it’s a dream, but only if you know where to look. Without a plan, you might spend your whole day looking at a lot of grass and not much else.
That’s where a professional photography tour comes in. But here’s the thing: not all tours are created equal. Some are designed for families looking for a quick thrill, while others are built specifically for those of us who carry ten pounds of glass and wait twenty minutes for a Great Blue Heron to blink.
Choosing the right experience can be the difference between coming home with a memory card full of blurry "specs" in the distance or a portfolio-worthy collection of wildlife portraits. In this guide, I’m going to break down how to choose the best Everglades photography tour based on your goals, your gear, and your budget.
And if you want to skip the guesswork entirely, you should definitely check out our Everglades Photography Guide to help you prepare for the trip of a lifetime.
1. Understand the Three Main "Zones" of the Everglades
The Everglades is huge, and different areas offer vastly different photographic opportunities. Before you book a tour, you need to know which "version" of the Everglades you want to capture.
The Shark Valley Area (Central)
This is famous for the 15-mile loop road. It’s one of the best places to see alligators up close, sometimes too close, and a variety of wading birds. Tours here are usually tram-based or bicycle-based. It’s great for beginners, but serious pros might find the lack of off-trail access limiting.
The Flamingo Area (South)
Located at the very end of the main park road, Flamingo is the gateway to Florida Bay and the mangrove backcountry. This is where you go for crocodiles (yes, the Everglades is the only place where both gators and crocs coexist), manatees, and spectacular coastal birds. Boat tours are the standard here.
The Western Everglades (Big Cypress & Ten Thousand Islands)
If you want that "old Florida" swamp feel with cypress domes and narrow waterways, this is your spot. This area is incredible for capturing the elusive Ghost Orchid or wading through the water for that low-angle shot. It's also the best spot for private pole boat tours, which are silent and perfect for getting close to skittish wildlife.
 1")
2. Compare the Boat Types: Airboat vs. Pole Boat vs. Motorboat
The vessel you choose dictates the type of photos you can take. This is a crucial part of the photography booking experience.
- Standard Airboats: These are the iconic Everglades "fan boats." They are loud, very loud. While they are fun for tourists and can cover a lot of ground (water?), the noise often scares away birds before you get within range. If you book a budget airboat tour ($30–$50), don't expect a lot of "stop-and-wait" time for photos.
- Private Pole Boats: These are the gold standard for serious wildlife photographers. A guide uses a long pole to push the boat silently through the shallows. This allows you to drift right up to a Roseate Spoonbill or a hunting alligator without them even noticing you’re there.
- Tram Tours: Great for stability and long-lens work because you aren't on moving water. However, you are stuck on a fixed path. It's a solid, accessible option for those who might not want to spend the day on a small boat.
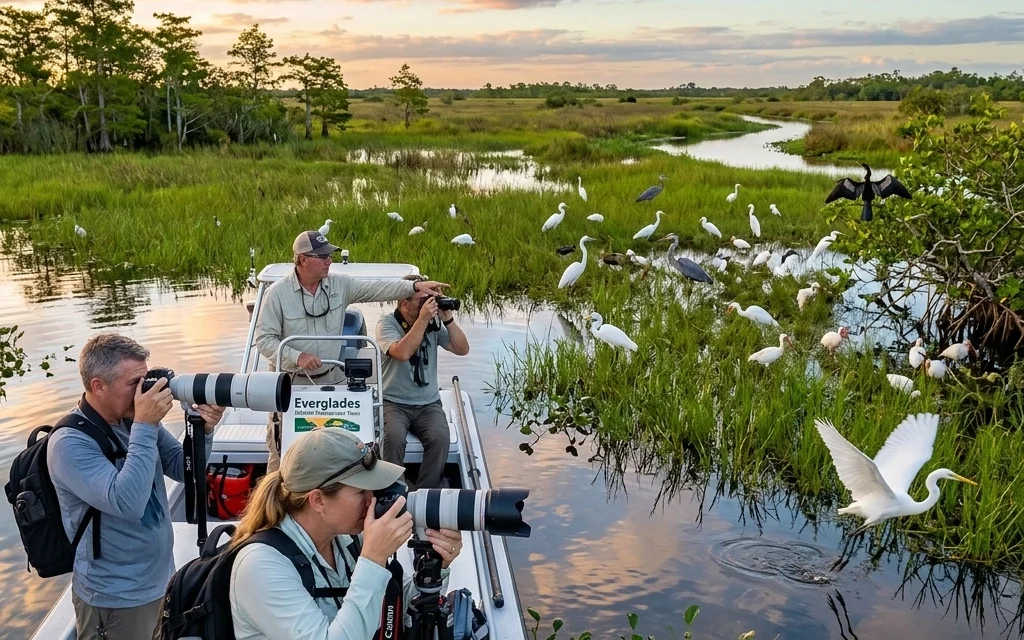
3. Group Size: Why "Semi-Private" is the Magic Number
I’ve seen it happen a hundred times: a photographer joins a tour with 20 other people. They spot a rare Snail Kite, but by the time the boat maneuvers so everyone can see it, the bird is gone. Or worse, you’re stuck behind someone’s iPad while trying to frame a shot with your 600mm lens.
For the best results, look for tours that limit the group size to 2–3 photographers[3]. A semi-private experience means the guide can position the boat specifically for your angle and your light. When it’s just you and a guide, you can say, "Hey, can we move five feet to the left to get the sun behind that heron?" and they’ll do it.
If you are looking to level up your kit before the trip, take a look at our essential photography gear recommendations to make sure you have the right stabilization for these small boats.
 2")
4. Price vs. Value: What are you actually paying for?
Let’s talk numbers. You can find "Everglades tours" for $40 all day long on Groupon. But as the saying goes, you get what you pay for.
- Budget Tours ($30–$60): These are 60-90 minute "tours" focused on speed and general sightseeing. You’ll see a few gators, but you won’t have the time or the positioning for high-end photography[5].
- Professional Photo Safaris ($150–$500+): These are led by people who are often photographers themselves. They understand "Golden Hour." They won't start the tour at 10:00 AM when the light is harsh; they’ll have you on the water before the sun breaks the horizon. A 2.5-hour private safari might run you around $496 per group, but the quality of the shots you’ll get is incomparable[5].
Investing in a high-end tour is an investment in your portfolio. You can also see some of the results of professional Everglades shoots over at Edin Fine Art to see what's possible when the timing and guide are right.
5. Check the Guide’s Credentials
Is your guide a naturalist or just a boat captain? In the Everglades, you want a guide who understands animal behavior. A great guide can look at a ripple in the water or a specific call and tell you exactly what’s about to happen.
If they can predict that a bird is about to take flight, you can have your camera ready in burst mode. That’s the difference between a shot of a bird sitting on a stick and a dynamic action shot of a bird catching a fish.
 3")
6. Seasonality Matters
The Everglades changes drastically between the dry season and the wet season.
- Dry Season (November – April): This is the best time for wildlife photography. As the water levels drop, all the animals congregate around the remaining deep-water holes. You’ll see a higher density of wildlife than almost anywhere else in North America.
- Wet Season (May – October): It’s hot, buggy, and the animals disperse because there is water everywhere. However, the afternoon thunderstorms create incredibly dramatic skies. If you’re into landscape photography and want to use some sky overlays to enhance your shots later, the summer clouds are unmatched.
7. Don't Forget the "Land" Options
While boat tours are king, don't overlook boardwalk tours or "swamp walks." Walking through the Fakahatchee Strand with a guide can lead to intimate macro shots of rare orchids and ferns that you simply can’t get from a boat. If you’re traveling from out of town and looking for a place to stay near these trailheads, you might check out some cheap weekend getaways in the surrounding areas of Homestead or Everglades City.
 4")
Making Your Decision
So, how do you choose?
- If you are a beginner: Start with a Tram Tour at Shark Valley or a standard 1.5-hour boat tour in Flamingo[5]. It’s a low-cost way to get your feet wet (metaphorically).
- If you are a bird enthusiast: Look for the "Everglades Private 2.5 Hour Photo and Birding Safari." The focus on avian life is worth the premium[5].
- If you want the ultimate experience: Book a multi-day workshop. Some expeditions offer 6-day deep dives into the "Birds and Wildlife of the Everglades," which include gear tutorials and post-processing tips[6].
Before you head out into the heat and humidity, make sure you've read up on the latest camera reviews to ensure your weather sealing is up to the task. The Everglades can be brutal on equipment.
For more tips on how to capture the perfect shot, check out the community over at Shut Your Aperture. It's a great place to share your Everglades captures and get feedback from fellow enthusiasts.
Final Pro Tip
No matter which tour you choose, bring more water than you think you need, more mosquito repellent than you think is humanly necessary, and a long lens (at least 400mm).
Ready to master the marsh? Grab your copy of the Everglades Photography Guide and let's get to work. The "River of Grass" is waiting for its close-up, and with the right tour, you'll be the one to take it. You can find more educational resources on our educational page to help sharpen your skills before you arrive.
Happy shooting!


