
You’ve just spent a week exploring the cobblestone streets of Europe or the neon-soaked corners of Tokyo. Your memory cards are full, your feet are tired, and you have about 2,000 RAW files waiting for you. This is the moment where travel photography goes from being an adventure to feeling like a job. The question is: how do you get through those photos without losing your mind: or your creative spark?
For years, the answer was simple: Lightroom. But lately, the conversation has shifted. Luminar Neo has crashed the party with AI tools that feel like magic, leaving many photographers wondering if they should make the switch or find a way to let these two giants play nice together.
As someone who has spent years perfecting my photography booking experience, I know that the time you spend behind the screen is just as important as the time you spend behind the lens. Let’s dive into the battle of Luminar Neo vs. Lightroom and figure out which one belongs in your travel bag.
The Lightroom Legacy: Organization and the Cloud
Lightroom is the industry standard for a reason. Its cataloging system is second to none. When you’re dealing with the sheer volume of images that come with travel, being able to tag, flag, and sort photos by metadata (like the lens used or the GPS location) is a lifesaver.
One of the biggest perks for the modern traveler is the Adobe Creative Cloud ecosystem. You can start editing a shot on your laptop at a cafe in Paris and finish it on your iPad while sitting on a train to Lyon. This seamless syncing is a massive advantage if you need to post high-quality content to social media while you’re still on the move.
However, Lightroom can sometimes feel a bit… clinical. It’s built to get your images "technically correct." It fixes exposure, handles noise, and corrects lens distortion beautifully. But when you want to take a photo from "accurate" to "extraordinary," you often have to work pretty hard for it. If you're looking for more gear advice, check out our guide on essential photography gear.

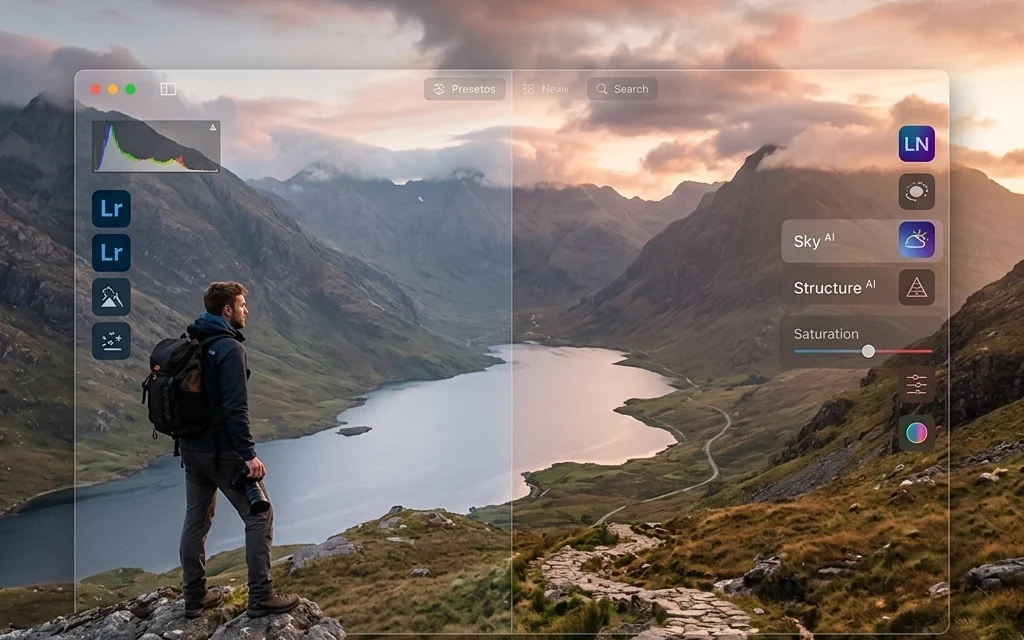
A wide-angle landscape shot of a mountain range at sunset, showing the complex interface of a photo editing software with various sliders for exposure, contrast, and color grading on a high-resolution laptop screen.
Luminar Neo: The Creative Powerhouse
This is where things get exciting. While Lightroom focuses on the "what," Luminar Neo focuses on the "feel." If Lightroom is the organized filing cabinet, Luminar Neo is the master artist standing by with a brush.
For travel photographers, Luminar Neo is a game-changer because it tackles the most common travel hurdles with AI-driven speed. Think about the last time you visited a world-class landmark. Was the sky a boring, flat grey? Were there 400 tourists in your shot? In the old days, fixing these issues took hours of tedious masking.
With tools like Sky AI, you can swap a dull sky for a dramatic sunset in literally two clicks. What makes Luminar Neo the premier choice here is how the AI handles the relighting. It doesn't just stick a new sky on top; it analyzes the colors of the new sky and "Relights" the entire scene so the reflections on the water or the glow on the buildings actually match. You can explore these creative possibilities yourself at https://skylum.evyy.net/BXVoBJ.
Key Tools That Save Your Travel Photos
Let’s talk about the specific tools that make Luminar Neo stand out in a travel workflow.
1. GenErase and Object Removal
Nothing ruins a beautiful shot of a hidden speakeasy: maybe one of Miami’s hidden speakeasies: faster than a bright orange traffic cone or a stray power line. Luminar’s GenErase uses generative AI to not just remove an object, but to intelligently fill in the gap with textures that actually belong there. It’s far more advanced than Lightroom’s basic healing brush.
2. Relight AI
Travel photography often means shooting in less-than-ideal light. You might be shooting against the sun to catch a specific monument. Relight AI allows you to independently adjust the lighting of the foreground and the background. It’s like having a portable lighting kit that you can use after the trip is over.
3. Atmosphere AI
Sometimes a scene needs a little more "mood." Whether you’re shooting the foggy streets of London or the misty mountains of a National Park, Atmosphere AI can add realistic fog, haze, or mist without obscuring the subjects in your shot. This is the kind of professional touch I often talk about over at Edin Fine Art.

An ultra-realistic before-and-after comparison of a travel photo. The 'before' shows a crowded city square under a grey sky; the 'after' shows the same square with tourists removed using AI and a vibrant, warm sunset sky replaced with realistic lighting reflections on the cobblestones.
The Hybrid Workflow: The Best of Both Worlds
Here is a little secret: you don’t actually have to choose. Most professional travel photographers, including myself, use a hybrid workflow.
Lightroom is my home base. It’s where I import my photos, do my initial culling (deleting the blurry ones), and manage my library. But when I find that "hero" shot: the one that deserves to be a print or a portfolio piece: I right-click and "Edit in Luminar Neo."
Luminar Neo works perfectly as a plugin for Lightroom. I do the heavy lifting: the Sky AI, the GenErase, and the Portrait AI for any locals I photographed: and then I hit save. The edited version pops right back into my Lightroom catalog next to the original. This gives you the organizational power of Adobe with the creative "superpowers" of Skylum.
If you're just starting out and need some inspiration for where to take these photos, you might want to look into cheap weekend getaways or even some restaurants in downtown Golden for some urban lifestyle practice.
Why Luminar Neo Wins for the "Vibe"
If you’re someone who wants to spend more time traveling and less time editing, Luminar Neo is the clear winner. The learning curve is much shallower than Lightroom’s. You don’t need to spend weeks watching tutorials to understand how to mask a face or enhance a sunset. The AI does the "math" so you can focus on the "art."
For travel portraits, the Portrait AI is incredible. It can subtly enhance eyes, smooth skin while keeping texture, and even add a bit of "slim" or "light" to the face to compensate for harsh overhead midday sun. It’s reassuring to know you can fix those little issues easily. For more on the technical side of things, I always recommend checking out Shut Your Aperture for gear reviews and community tips.

A close-up portrait of a traveler in a vibrant outdoor market. The lighting is soft and flattering, with the background beautifully blurred, showcasing the 'Portrait AI' capabilities of enhancing facial features while maintaining a natural, high-end look.
Comparing the Costs
Lightroom is a subscription-only model. You pay every month, forever. For many, this is fine because it includes Photoshop and cloud storage.
Luminar Neo offers more flexibility. You can go the subscription route to get all the latest AI updates and generative features, or you can often find lifetime license options if you prefer to own your software outright. When you're trying to budget for a big trip: maybe choosing between the Dominican Republic vs Cancun: having one less monthly bill can make a difference.
Final Verdict: Which One Should You Buy?
If you are a high-volume shooter who prioritizes organization, mobile editing, and industry-standard reliability, start with Lightroom. It is the backbone of a professional workflow.
However, if you want your photos to have a "wow" factor that Lightroom simply can't provide without hours of manual work, Luminar Neo is an essential addition to your toolkit. For the traveler who wants to turn a grey day into a masterpiece or remove a distracting crowd from a sacred temple, Luminar Neo isn't just "better": it's a necessity.
My recommendation? Grab Lightroom for the "boring" stuff like sorting and basic color correction, but use Luminar Neo to bring the magic back to your travel memories.
Editing should be the part of the process where you get to relive the joy of your trip, not a chore that keeps you from planning your next one. Whether you’re heading to see an Atlanta event photographer at work or just taking snaps at breweries in Williamsburg, VA, make sure your workflow helps you tell the best version of your story.

A clean, modern workspace featuring a high-end monitor displaying a stunningly edited landscape photo. Beside the monitor is a camera and a notebook, symbolizing a streamlined and professional photography workflow.
Ready to level up your travel edits? You can check out the latest features and get started with Luminar Neo here. For more deep dives into the world of photography, head over to my personal blog where I share more behind-the-scenes insights from my travels.


