
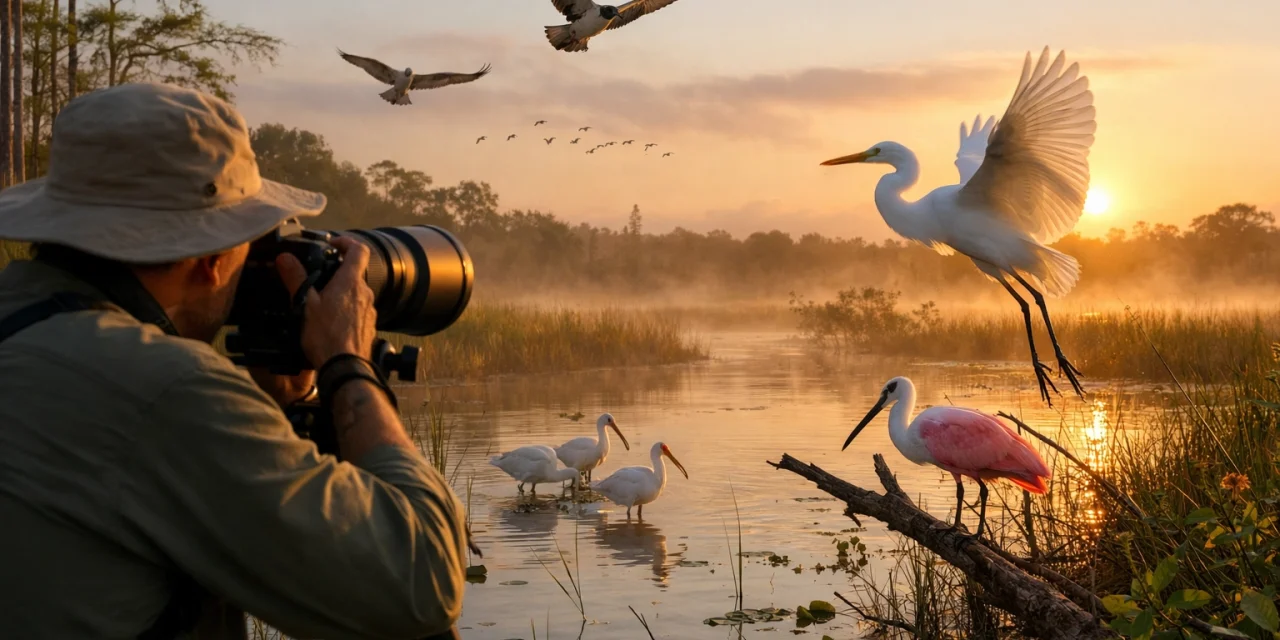
There is a specific kind of magic that happens in the Florida Everglades just as the sun begins to peek over the sawgrass. The air is thick with the scent of damp earth, the chorus of frogs begins to fade, and then: whoosh: the massive wingspan of a Great Blue Heron cuts through the mist.
If you’ve ever stood on a boardwalk with your camera in hand, waiting for that perfect moment when a Roseate Spoonbill takes flight, you know exactly why we do this. But as any seasoned pro will tell you, the Everglades can be as challenging as it is beautiful. It’s a vast, prehistoric landscape that doesn't give up its secrets easily.
Whether you’re a local hobbyist or traveling from across the globe to capture Florida’s iconic avian life, this guide is designed to help you navigate the "River of Grass" with confidence. And if you want to skip the trial and error and get straight to the best shots, my comprehensive Everglades Photography Guide is the ultimate shortcut to success.
Timing is Everything: The Dry Season Advantage
In many parts of the world, photography is all about the "Golden Hour." In the Everglades, it’s about the "Dry Season."
From November through early April, the water levels in the marshlands begin to recede. This is the secret sauce for bird photography in Florida. As the water disappears from the vast prairies, the fish and crustaceans become concentrated in deeper "alligator holes" and canals. For the birds, this is an all-you-can-eat buffet. For photographers, it means the birds are gathered in predictable, accessible locations rather than scattered across millions of acres of inaccessible swamp.
Winter is also nesting season. By February and March, you’ll find Anhingas and Herons tending to chicks in nests that are often just a few feet from the public boardwalks. If you visit during the wet summer months, you'll be fighting high water, scattered wildlife, and, honestly: more mosquitoes than any human should have to endure.

Top Photography Locations You Can’t Miss
The Everglades is huge, but a few specific spots offer high-yield photography opportunities without requiring a machete and a swamp buggy.
1. Anhinga Trail (Homestead)
Located near the Royal Palm Visitor Center, this is arguably the most famous photography spot in the park. Why? Because the birds here are remarkably "tame." Because they see humans every day, you can get incredibly close to Anhingas, Egrets, and Herons. This is one of the few places where you don't necessarily need a 600mm lens to get a frame-filling shot. It’s also a fantastic spot for alligator action.
2. Shark Valley
Right off the Tamiami Trail, Shark Valley features a 15-mile loop that is a paradise for wading birds. I highly recommend renting a bike or taking the tram. The observation tower at the halfway point is a hidden gem for bird-in-flight (BIF) photography. Since you’re elevated, you can often capture soaring birds at eye level rather than shooting up at the sky, which makes for much more compelling backgrounds.
3. Wakodahatchee Wetlands (Delray Beach)
While technically a short drive north of the actual National Park, no bird photographer should visit South Florida without stopping here. This man-made wetland features a boardwalk that puts you right in the middle of a massive rookery. You’ll see Wood Storks, Great Blue Herons, and Cormorants nesting at eye level. It’s the best place in the state to capture nesting behavior and chick-feeding sequences.
If you’re feeling overwhelmed by the logistics of where to go and when, we’ve handled the heavy lifting for you in our photography booking experience services, ensuring you’re always in the right place at the right time.
Essential Gear for the Swamp
When it comes to gear, versatility is your best friend. The Everglades presents a mix of tight, close-up opportunities and distant subjects across the marsh.
- The "Gold Standard" Lens: A 200-600mm or 150-600mm zoom lens is the most popular choice for a reason. It gives you the reach for shy songbirds or distant raptors while allowing you to pull back when a Heron decides to land five feet away from you.
- The Portrait Lens: A 70-200mm f/2.8 is surprisingly useful at places like Anhinga Trail. The wide aperture helps blur out busy mangrove backgrounds, creating beautiful bokeh that makes the bird's plumage pop. Check out our camera reviews 2024 for the latest on high-performance glass.
- The Wide Angle: Don’t forget a 16-35mm. The Everglades landscapes: especially at sunrise: are breathtaking. Including a bird in a vast landscape shot can tell a much more powerful story than a tight headshot.
- Support: While many modern lenses have incredible stabilization, a sturdy monopod can be a lifesaver during a long day of tracking birds in flight.
For a deeper dive into what I carry in my bag, take a look at our list of essential photography gear.

Technical Settings for Sharp Captures
Bird photography is a game of milliseconds. One wrong setting and that once-in-a-lifetime shot of an Osprey catching a fish is a blurry mess.
Shutter Speed is King
For birds in flight, I never drop below 1/2000s. If the light is good, I’ll push it to 1/3200s or 1/4000s to freeze the individual feathers on the wingtips. For perched birds, you can drop to 1/800s to keep your ISO lower, but remember that birds are twitchy: even a small head move can cause motion blur.
Aperture and Focus
I usually shoot wide open (f/4 or f/5.6 depending on the lens). This isolates the subject from the often-distracting swamp foliage.
- Autofocus Mode: Use Continuous AF (AF-C or AI Servo).
- Eye Tracking: If your camera has Animal/Bird Eye AF, use it. It has revolutionized bird photography. Ensure the eye is the sharpest part of the image; if the eye isn't sharp, the photo is usually a discard.
Use Back-Button Focus
If you haven't switched to back-button focus yet, now is the time. It allows you to separate the focusing action from the shutter release, which is crucial when a bird is alternating between sitting still and suddenly taking off.

Pro Tips for Next-Level Images
Anyone can take a photo of a bird. To create art, you need to think about the environment and the light.
- Get Low: Whenever possible, try to get at eye level with the bird. Shooting down at a bird on the ground makes the image feel like a snapshot. Getting low creates an intimate perspective that draws the viewer into the bird's world.
- Follow the Light: Position yourself so the sun is at your back. This "front-lighting" illuminates the details under the wings and brings out the vibrant colors of the feathers.
- Patience Over Pacing: Don't just walk the boardwalk looking for birds. Find a spot with good light and activity, and stay there. If you wait, the birds will eventually forget you’re there and start exhibiting natural behaviors like hunting, preening, or mating displays.

Mastering the Everglades
The Everglades is one of the most unique ecosystems on the planet, and capturing its beauty requires a blend of technical skill and local knowledge. It can be frustrating to spend thousands on gear and travel only to end up in the wrong part of the park at the wrong time of day.
That’s exactly why I created the Everglades Photography Guide. It’s a culmination of years spent in the field, documenting the exact GPS coordinates of the best spots, the best times for specific species, and the settings I use for every lighting condition the swamp throws at me.
Whether you're looking to capture the perfect silhouette of a Roseate Spoonbill against a pink Florida sunset or the intense stare of a Snail Kite, having a roadmap makes all the difference.
Photography is about the joy of the hunt and the thrill of the capture. With the right preparation, the Everglades will give you shots that you’ll be proud to hang on your wall for a lifetime. If you're looking for more inspiration or want to see what else we're up to, feel free to explore our educational resources or browse our latest reviews.
Now, grab your gear, check your batteries, and I'll see you out in the marsh!


