
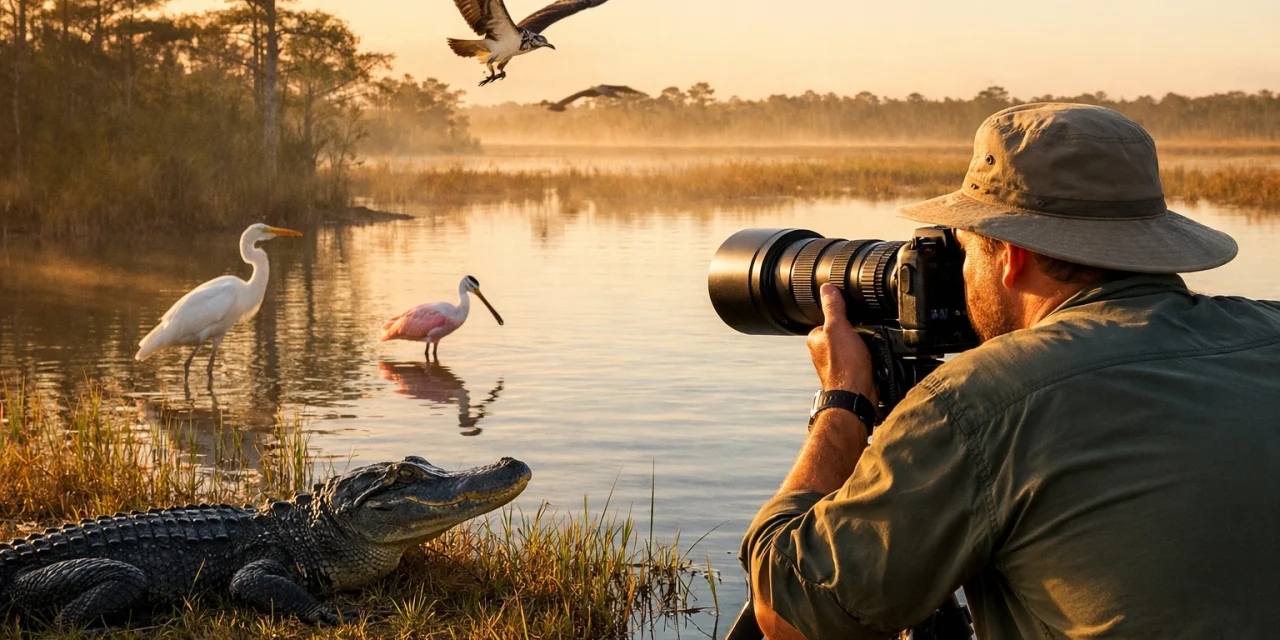
If you’ve ever stood on a boardwalk in the Everglades and watched a great egret glide in like it owns the place, you already get it: this park is a wildlife photographer’s dream. It’s also a place that will humble you fast: harsh sun, wet air, fast-moving birds, and animals that don’t care about your shot list.
This guide gives you the practical game plan: when to go, where to shoot, what gear actually matters, and the settings and field tactics that help you come home with keepers (not just “almost” photos). And if you want the quickest path to the best locations, seasonal timing, and proven shooting setups, grab the Everglades Photography Guide here: https://blog.edinchavez.com/product/everglades-photography-guide/.
Quick SEO cheat sheet (so you nail the basics fast)
- Primary keyword: Everglades wildlife photography
- Best seasons: dry season (winter–early spring) for concentrated wildlife; nesting season for birds
- Best light: sunrise + last 2 hours before sunset
- Best subjects: wading birds, alligators, crocodiles, turtles, raptors, otters (rare but possible)
- Most important skill: tracking + timing (more than “perfect gear”)
What wildlife you can realistically photograph in the Everglades
You’re not going to photograph everything every trip: and that’s normal. The Everglades rewards repeat visits, patience, and learning patterns. Here’s what you can expect most often:
Birds (the main event)
- Anhingas, cormorants
- Great egret, snowy egret, great blue heron, tricolored heron
- Wood storks (iconic Everglades subject)
- Purple gallinules (if you see one, you’ll remember it)
- Ospreys, hawks, owls (timing + luck helps)
Reptiles
- American alligators (common, photogenic, often close-ish)
- American crocodiles (more localized, still possible depending on where you go)
Mammals (possible, not guaranteed)
- River otters (tough but doable in the right spots)
- Bobcat, black bear, Florida panther (rare: don’t build your trip around these)
When to go: timing matters more than you think
Best time of day
Early morning is your best friend: soft light, active wildlife, fewer people, and calmer wind. Late afternoon can be excellent too, especially along canals where the sun angle can illuminate the far bank.
Plan: arrive early enough that you’re set up and ready to shoot at sunrise. Not pulling into the parking lot at sunrise: already shooting.
Best season for Everglades wildlife photography
- Dry season (roughly winter through early spring): water sources shrink and wildlife concentrates. This is when “easy mode” Everglades can happen.
- Nesting season: certain areas come alive with courtship, nest building, and chicks. If you love behavior and storytelling shots, this is prime time.
The best Everglades photography locations (and what they’re good for)
Different spots produce different “styles” of images. Think of these as tools in a kit.
Anhinga Trail (classic, productive, beginner-friendly)
This is one of the most reliable places to photograph birds at close range. You’ll often get approachable subjects: anhingas drying their wings, herons stalking the water, egrets in clean light, and alligators cruising right under the boardwalk.
What to shoot here
- Bird portraits at eye level (as close as the boardwalk allows)
- Feeding behavior and interactions
- Reptiles with strong reflections

Shark Valley (wildlife + big “Everglades scale” scenes)
The loop offers constant chances for alligators, turtles, and wading birds. The observation tower gives you a panoramic look that’s perfect for sunrise/sunset mood and “this place is enormous” landscapes.
What to shoot here
- Alligators in context (roadside canals can be very active)
- Minimalist water + sky compositions
- Wide scenes from the tower
Big Cypress National Preserve (when you want variety and fewer crowds)
Technically not “inside” Everglades National Park, but it’s often part of the same trip for wildlife photographers. You’ll find swamp scenes, birds, plants, and that raw Florida wetland atmosphere.
What to shoot here
- Moody cypress swamp compositions
- Birds and reptiles with more natural backgrounds
- Texture studies: bark, water patterns, wetland plants
Sweetwater Strand (otter potential, higher difficulty)
If otters are on your wish list, this is the kind of place where you can get lucky: especially if you move slowly, scan constantly, and accept that the water is dark and the action is fast.
What to shoot here
- Otters swimming/hunting (if you catch them)
- Low-contrast, moody wildlife images
Want a tight plan for which locations to prioritize by season and what to expect at each? The Everglades Photography Guide lays it out clearly: https://blog.edinchavez.com/product/everglades-photography-guide/
Gear that actually helps in the Everglades (without overcomplicating it)
Everglades gear choices come down to reach, speed, and protection.
Camera body: what matters most
- Solid autofocus (especially subject/bird detection if you have it)
- Clean performance at higher ISO (you’ll use it at dawn)
- Fast burst rate helps, but AF consistency matters more
If you’re still deciding, our gear roundups can help you narrow options: https://photoguides.org/camera-reviews-2024
Lenses: a practical Everglades kit
1) Telephoto zoom (workhorse): 200–600mm
This is the single most useful lens type for Everglades wildlife photography. It covers perched birds, action, and reptiles without forcing you too close.
2) Midrange zoom: 24–70mm (or similar)
For landscapes, environmental wildlife shots, boardwalk scenes, and travel storytelling.
3) Optional wide angle
If you love dramatic skies, sunrise color, and big marsh scenes, bring it.
Support: tripod vs monopod vs handheld
- Handheld is common and effective if your lens isn’t a monster and you shoot fast shutter speeds.
- Monopod is a great compromise for long lenses: less fatigue, quick to reposition.
- Tripod is useful for sunrise landscapes, long exposures, or if you’re waiting for behavior at one spot.
Need a simple checklist? This gear page is a good starting point: https://photoguides.org/essential-photography-gear
Protection from the Everglades (humidity is real)
- Rain cover or simple plastic cover for sudden weather
- Microfiber cloths and a blower (you’ll use them)
- Extra batteries (humidity + long sessions chew through power)
- A small towel in your bag (sounds dumb until it saves you)

Settings that work (and why)
These aren’t rigid rules: think of them as a strong baseline you can adjust fast.
Birds in motion (takeoff, landing, flying)
- Shutter: 1/1600–1/3200 (start at 1/2000)
- Aperture: f/5.6–f/8 (enough depth for wings/eyes)
- ISO: Auto ISO (let it float; sharp beats clean)
- AF mode: continuous AF + tracking
- Drive: high burst
Perched birds and calm wildlife
- Shutter: 1/500–1/1000 (higher if they’re twitchy)
- Aperture: f/5.6–f/7.1 for subject separation but enough sharpness
- Focus point: prioritize the eye
Alligators and crocodiles (portraits + detail)
You can get amazing texture: scales, eyes, teeth, water droplets.
- Shutter: 1/500–1/1000
- Aperture: f/6.3–f/8 (depth helps on the head)
- Tip: watch your highlights: Florida sun will blow out bright water fast
Field techniques that get you better shots immediately
1) Get to eye level (without being dramatic about it)
Eye-level images feel intimate and alive. On boardwalks, you can’t always go lower, but you can:
- shoot through gaps
- choose angles where the bird is higher on a branch
- wait for the subject to move to a better plane
2) Make the background part of the plan
In the Everglades, messy backgrounds are the #1 reason “cool subject” becomes “meh photo.”
- shift a few steps for cleaner reeds or darker water
- use wider apertures to soften clutter
- look for separation between subject and background
3) Focus on the eyes (then re-check it)
If the eye is soft, the photo is basically done. Use:
- eye AF if it works reliably
- single-point AF for tricky situations
- quick playback zoom to confirm sharpness early
4) Learn a few bird behaviors (it’s like a cheat code)
You don’t need to memorize every species. Just learn patterns:
- birds often poop before takeoff (seriously)
- head-bobbing and crouching can signal launch
- hunting birds repeat routes and perches
5) Use reflections and natural frames
Still water can give you clean reflections that feel “fine art” with almost no extra effort. Framing with reeds or branches adds depth: just keep it subtle.

Safety and ethics (the “good photo” that doesn’t ruin it for everyone)
The Everglades is not a petting zoo. You’ll see people do dumb stuff. Don’t be that person.
- Keep a respectful distance from alligators and crocodiles: unpredictable is the default.
- Don’t bait wildlife or disturb nesting birds.
- Stay on trails and boardwalks where required (both for safety and habitat protection).
- If an animal changes behavior because of you, you’re too close.
Good ethics also lead to better photos: calm wildlife behaves naturally, and that’s what you actually want to capture.
A simple 1-day Everglades photo plan (that works for most people)
If you’re overwhelmed, use this structure:
Sunrise to mid-morning: birds + action
Start somewhere reliable for close bird activity (boardwalks and wetlands). Work the best light while the park is waking up.
Midday: scouting + details
Midday light is harsh, but it’s perfect for:
- scouting locations for sunset
- shooting detail studies (scales, feathers, textures)
- practicing tracking on common birds
Late afternoon to sunset: backlight control + golden light
Set up where the sun angle helps you (often with the light behind you across water). Look for warm tones, rim light, and calmer wind.
If you want this kind of plan tailored by season: what to shoot, where, and what time: this is exactly what the Everglades Photography Guide is built for: https://blog.edinchavez.com/product/everglades-photography-guide/
How to come home with a “portfolio set,” not random singles
Here’s the mindset shift: don’t just chase species. Build a set.
- Portrait: sharp eye, clean background
- Behavior: feeding, flight, interaction
- Environmental: subject in habitat (wide or midrange)
- Detail: feathers, scales, patterns
- Atmosphere: fog, dramatic sky, silhouettes
If you’re into more refined “fine art” framing and want to see how I think about composition and mood, you can also explore my work at https://www.edinfineart.com and photography resources on https://www.blog.edinchavez.com.
The fastest way to shorten your learning curve
Everglades wildlife photography is one of those things where small local knowledge makes a huge difference: which boardwalk is better in which season, where the light falls in late afternoon, and what lens choice saves your back without sacrificing reach.
That’s why we put together the Everglades Photography Guide: so you can spend less time guessing and more time shooting:
https://blog.edinchavez.com/product/everglades-photography-guide/


