
Category: Photo Guides
The Everglades is a place unlike any other on Earth. It’s a vast, slow-moving river of grass, a labyrinth of mangroves, and a sanctuary for some of the most prehistoric and beautiful creatures you’ll ever lay eyes on. But let’s be real for a second: it’s also a tough place to take a decent photo. Between the humidity that fogs up your lens, the mosquitoes that seem to have a taste for photographers, and the tricky Florida light, it’s easy to walk away with a memory card full of "almost" shots.
I’ve spent countless hours trekking through the River of Grass, and I’ve made every mistake in the book. The good news? You don't have to. If you’re planning a trip down south or you’ve been struggling to capture the magic of the Glades, here are the seven most common mistakes I see photographers making and, more importantly, how to fix them before your next outing.
1. Fighting the Midday Florida Sun
Florida is known as the Sunshine State for a reason, but for a wildlife photographer, that "sunshine" can be a total nightmare. By 10:00 AM, the sun is high, the shadows are harsh, and everything starts to look flat. I see so many people out on the Anhinga Trail at high noon, wondering why their photos look washed out and uninspiring.
The Fix: You’ve got to embrace the "Golden Hour." In the Everglades, the first and last hour of light are transformative. The light becomes soft, warm, and golden, which adds a layer of drama to a Great Blue Heron or an alligator basking on a log. If you absolutely have to shoot during the day, try looking for shaded areas in the cypress domes or use negative exposure compensation to keep your highlights from screaming.
For a deeper dive into mastering these conditions, I highly recommend checking out our Everglades Photography Guide. It covers the best spots to be during those critical lighting windows.
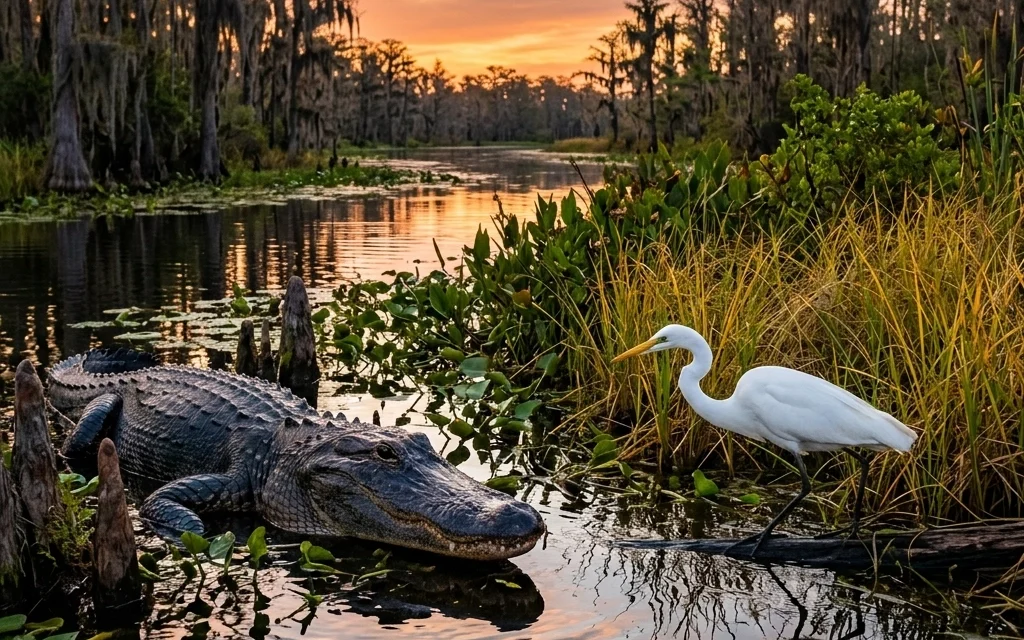
2. Blowing Out the Highlights on White Birds
The Everglades is home to some stunning white birds: Great Egrets, Snowy Egrets, and Wood Storks. The mistake? Your camera sees all that bright white and gets confused. If you rely on your camera’s auto-exposure, you’ll likely end up with a "ghost bird": a white blob with absolutely no feather detail.
The Fix: Learn to read your histogram. This is a game-changer. If the graph is pushed all the way to the right and climbing the "wall," you’re losing detail. Dial in some negative exposure compensation (usually -0.7 to -1.3) to underexpose the shot slightly. You can always bring up the shadows in post-processing, but once those white highlights are "blown," they’re gone forever. Seeing a perfectly exposed Great Egret print at Edin Fine Art shows just how much texture you can actually capture when you get this right.
 1")
3. Using a Shutter Speed That’s Just Too Slow
Wildlife doesn’t like to sit still. Even when an alligator looks like a literal log, it can move with lightning speed when it wants to. And birds? They’re the masters of sudden movement. A common mistake is sticking to a shutter speed like 1/250s or 1/500s because "the bird is just standing there." Then, the bird takes flight, and you’re left with a blurry mess.
The Fix: Speed it up! For birds in flight, I rarely drop below 1/2500s. Even for a stationary bird, I like to stay around 1/1000s just in case they decide to stretch a wing or hunt. Don’t be afraid to bump up your ISO to achieve these speeds. Modern cameras handle noise incredibly well, and a sharp, slightly grainy photo is always better than a clean, blurry one. You can find more technical breakdowns on shutter speeds over at Shut Your Aperture.
4. Staying Too Far Away (or Bringing the Wrong Gear)
The Everglades is vast. If you show up with just a kit lens or a standard zoom, those "giant" alligators are going to look like tiny lizards in your photos. I see a lot of frustrated photographers trying to crop their way to a good image, only to end up with a pixelated disaster.
The Fix: You need reach. A lens in the 400mm to 600mm range is the sweet spot for the Glades. It allows you to fill the frame with the animal’s expression while maintaining a safe and respectful distance. If you’re looking for gear recommendations, check out our essential photography gear list. Remember, it's not just about the focal length; it's about being able to see the "soul" in the animal's eyes.
 2")
5. Focusing on the Grass Instead of the Eye
The Everglades is a busy environment. There’s sawgrass, mangroves, and cypress knees everywhere. Often, your camera’s autofocus will get distracted by a blade of grass in front of the bird rather than the bird itself. There’s nothing more heartbreaking than getting home and realizing your focus was three inches off.
The Fix: Use single-point focus or "Eye AF" if your camera has it. Always, always aim for the eye. If the eye isn't sharp, the photo usually won't resonate with the viewer. I also recommend using back-button focus, which separates the focusing trigger from the shutter button. This gives you way more control in messy environments. For more tips on technical execution, browse through our educational category.
6. Shooting Everything from Eye Level
We spend our whole lives seeing the world from about five to six feet off the ground. If you take all your photos from that height, they’re going to look… ordinary. When you photograph a gator or a wading bird from a high angle, you’re looking "down" on them, which creates a sense of detachment.
The Fix: Get low. I’m talking "get your knees dirty" low. When you get down to the animal’s eye level, the perspective shifts. The background blurs out more beautifully, and the viewer feels like they are part of the animal's world. It creates an intimate, powerful connection that you just can't get standing up. This is one of the "pro secrets" we discuss in detail in the Everglades Photography Guide.
 3")
7. Ignoring the "Story" and Only Shooting Portraits
A lot of photographers get "subject-blindness." They find a Roseate Spoonbill, and they take 500 photos of just the bird’s head. While portraits are great, the Everglades is a complex ecosystem. If you ignore the environment, you’re missing half the story.
The Fix: Step back and take an "environmental portrait." Show the bird surrounded by the expansive marsh or tucked into the tangled roots of a mangrove. This gives your work context and tells the viewer where the animal lives and how it survives. It turns a "picture of a bird" into a piece of art that tells a story about the Florida wilderness.
 4")
Bonus Tip: Know Your Subject
One mistake that isn't about gear or settings is not knowing animal behavior. If you know that a Great Egret tends to wiggle its neck right before it strikes at a fish, you’ll be ready for the action. If you know that alligators are more active in the cooler mornings, you’ll plan your trip accordingly.
Before you head out, do a bit of research on the species you're hoping to find. It makes the experience much more rewarding when you can predict what’s going to happen next. If you're looking for more inspiration on where to go next, check out our Travel section for more destination ideas.
Ready to Level Up Your Everglades Game?
The Everglades is a challenging, beautiful, and rewarding place for any photographer. It’s a place that demands patience and a bit of "swamp soul." By avoiding these seven mistakes, you’re already miles ahead of the crowd.
If you want to skip the trial and error and get straight to the best shots, grab a copy of our Everglades Photography Guide. It’s packed with exact GPS coordinates, seasonal tips, and gear advice specifically tailored for the Florida wetlands.
Photography is a journey, and there’s no better place to continue yours than in the heart of the Glades. Keep shooting, keep experimenting, and most importantly, enjoy the wild beauty of Florida. See you out on the trails!
 5")


