
Category: Photo Guides
The Everglades is a place of quiet, haunting beauty. If you’ve ever stood at the edge of the "River of Grass" as the sun begins to dip below the horizon, you know exactly what I’m talking about. It’s a prehistoric landscape where time seems to slow down, and the wildlife: from the iconic American Alligator to the elusive Roseate Spoonbill: takes center stage.
But here’s the thing: the Everglades is massive. It covers over 1.5 million acres of wetlands. If you just show up with your camera and hope for the best, you’re likely to spend more time swatting mosquitoes than pressing the shutter button. That’s why choosing the right photography tour is the single most important decision you’ll make for your trip.
Not all tours are created equal. Some are designed for families on vacation who want a quick thrill, while others are built from the ground up for serious photographers who need the right light, the right angles, and a guide who understands why you’re staring at a Great Blue Heron for forty-five minutes.
In this guide, I’m going to break down how to choose the best Everglades wildlife photography tour so you can walk away with a portfolio you’re proud of.
Why a Dedicated Photography Tour Matters
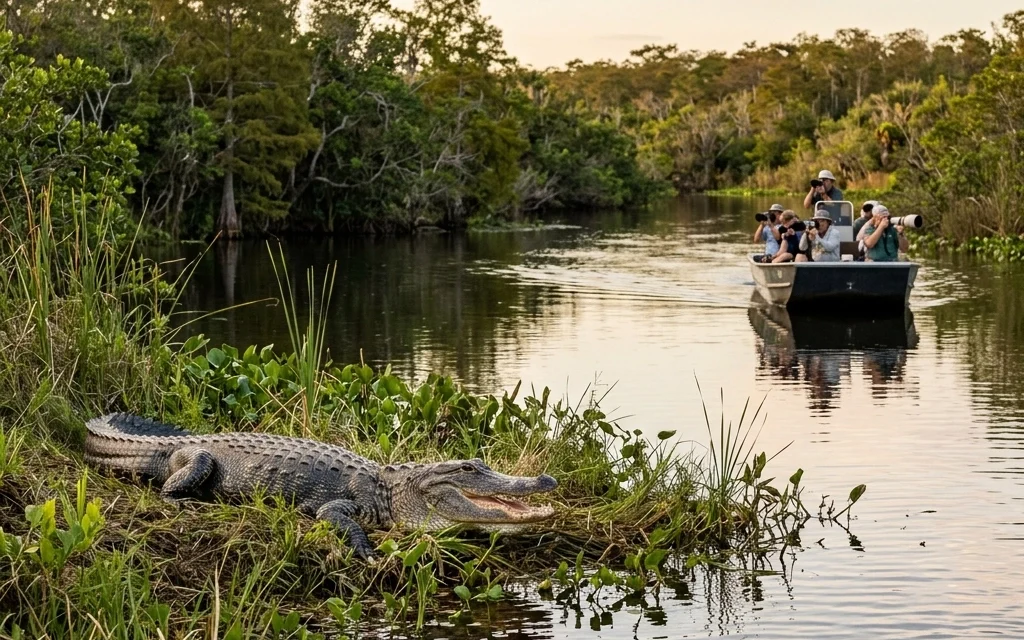
Most people visit the Everglades on an airboat. Don’t get me wrong, airboats are a blast, but they are generally terrible for serious photography. They are loud, they vibrate, and they usually carry 15 to 20 people who are all trying to see the same alligator.
A dedicated photography tour is different. These tours prioritize:
- Stability: You need a platform where you can use a tripod or at least have a steady hand for those long 600mm lenses.
- Timing: Nature doesn't follow a 9-to-5 schedule. The best tours start before dawn or end after dusk.
- Positioning: A good photography guide knows how to position the boat so the light is hitting your subject perfectly.
- Patience: Photographers need time. A standard tour has a schedule to keep; a photography tour waits until the bird finally takes flight.
Before you book, you should definitely check out my Everglades Photography Guide. It’s the ultimate resource for knowing exactly where to go and how to nail the shots once you get there.
 1")
Comparing the Different Types of Tours
When you start looking at options, you’ll find three main categories of tours in the Everglades. Each serves a different purpose depending on your goals and budget.
1. The Private Photography Safari
This is the gold standard. Usually, these tours involve a flat-decked boat specifically designed for stability. You’ll often find these operating out of Everglades National Park or the 10,000 Islands Wildlife Refuge.
- Pros: Total control over the itinerary, expert guides who are often photographers themselves, and the ability to bring all your essential photography gear without worrying about space.
- Cons: These are the most expensive options, often starting around $500 for a half-day session.
- Best for: Professionals or enthusiasts looking for specific shots (like a Snail Kite or a Panther).
2. The Multi-Day Workshop
If you want to immerse yourself in the ecosystem, a multi-day workshop is the way to go. These often combine field time with classroom instruction on editing and composition.
- Pros: You get to see multiple parts of the Everglades (like Shark Valley, Big Cypress, and the coast). You also benefit from the community of other photographers.
- Cons: Requires a significant time commitment (usually 3–5 days) and a higher price point.
- Best for: Photographers looking to level up their skills while exploring the region.
3. The Naturalist-Led Small Group Tour
Many companies offer "Eco-Tours" led by Florida Master Naturalists. While not strictly "photography tours," the small group size (usually 6 people or fewer) makes them a viable option.
- Pros: More affordable than private safaris and very educational regarding the biology of the park.
- Cons: You may be sharing the boat with non-photographers who might get restless if you want to stay in one spot for an hour.
- Best for: Casual photographers or those on a budget.
 2")
Key Factors to Consider Before Booking
The Guide’s Expertise
Does the guide understand photography? Ask them if they know what "backlighting" is or if they understand the importance of getting the camera sensor level with the water for a low-angle wildlife shot. If they don't, you're just on a boat ride. I always recommend checking out camera reviews and photography insights before your trip to ensure your kit is up to the task for the specific conditions your guide describes.
The Season and Timing
The Everglades has two seasons: Wet and Dry.
- Dry Season (November – April): This is the peak for photography. Water levels drop, forcing wildlife into concentrated pools. It’s also when the migratory birds arrive.
- Wet Season (May – October): It’s hot, buggy, and the wildlife disperses. However, the afternoon thunderstorms make for incredible landscape photography and dramatic skies. If you find yourself with a flat sky, you can always enhance it later using sky overlays.
The Boat Type
Look for "flat-bottom" or "pole boats." These can get into shallower water where the birds are feeding. If the tour operator mentions they use a stable, flat-decked boat, that’s a huge green flag for your tripod.
 3")
What to Expect on a Quality Tour
A high-end photography booking experience should feel personalized. When you book a tour through a reputable outfit, they should ask you about your experience level and what specific species you are hoping to capture.
On the day of the tour, expect an early start. I’m talking 5:00 AM early. You want to be on the water and set up before the sun cracks the horizon. The "Golden Hour" in the Everglades is fleeting but magical. The mist rising off the water combined with the first light hitting a Great Egret is a sight you won't forget.
During the tour, your guide should be looking for "the shot," not just "the animal." They should be checking the wind direction (which affects how birds take off) and the sun's position. For more tips on the technical side of these shots, visit my main photography blog.
What to Bring (Besides Your Camera)
Wildlife photography in the Florida swamps requires some preparation. Beyond your longest lens and a sturdy tripod, don't forget:
- Polarizing Filter: Essential for cutting glare on the water.
- Rain Covers: Even in the dry season, a rogue splash or a quick sunshower can happen.
- Sun Protection: The Florida sun is brutal, especially when it's reflecting off the water.
- Bug Spray: Specifically for the "No-see-ums" that come out at twilight.
If you are looking for more high-end inspiration of what is possible in this environment, take a look at the fine art gallery to see how light and composition come together in the Florida wild.
 4")
Making the Final Choice
When comparing tours, don't just look at the price tag. Look at the value of the time spent. A $100 tour that results in zero keepers is much more expensive than a $500 tour that yields a portfolio-worthy image.
If you’re serious about your craft, I highly recommend looking for tours that operate in the 10,000 Islands or the Deep Backcountry. These areas are harder to reach but offer the most pristine wildlife encounters.
Once you have your shots, if you're looking for a community to share them with or more technical advice, check out Shut Your Aperture. It’s a great place to connect with other gear enthusiasts and wildlife shooters.
 5")
Conclusion
The Everglades is one of the most unique photographic destinations on the planet. It’s a place that rewards the patient, the prepared, and those who aren't afraid to get a little muddy. By choosing a tour that prioritizes photography over sightseeing, you give yourself the best chance to capture the soul of the Florida wild.
Ready to start planning? Don't leave your success to chance. Grab the Everglades Photography Guide today and get the inside scoop on the best locations, seasons, and settings for the ultimate Everglades adventure.
Happy shooting, and I’ll see you out in the marsh!


